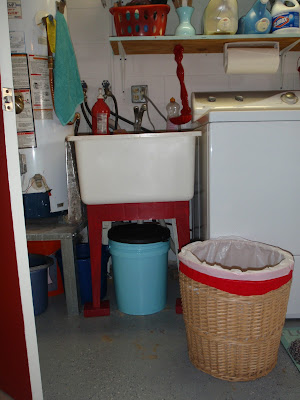
In reality, I have a Laundry "Area" that fits into a space in my husbands very well used and "Manly" garage. We do not have the type of garage that simply "stores stuff". My handy husband is a fixer. He has tools and greasy things and stuff that I can't name. So the garage is all his....all except for my little area where I do laundry.
I decided that I would make this little area as pretty and "me" as I could, so using some paint that we already had, a few thrift store finds and a couple of new "splurges", I made my Laundry Area a place that is cheeful, pretty and neat as a pin.
Notice the worn out rug, dingy sink, and orange dog food bucket.
And, After...a much happier place to do laundry! :)
Things to note, no more trash can. A brand new, very pretty, floor mat, pretty and fun colors, a nicely organized shelf with coordinating colors for storage.
I spray painted the "dog food bucket" to match my color theme and hot glued a band of red felt around my laundry basket. The red spoon is a soap holder. I scrubbed down the outside of the sink and painted the legs red to give a pop of color and make it appear as though it were on a "stand".
This was my one "splurge" item... it was $24 at Lowe's. But it was SO pretty, and I figured with all the other bits and pieces where I saved money...well, I just really wanted it. :)
Here are some steps I took...
I grabbed a can of white paint off the shelf...purchased for another project, but I bought a gallon so I have plenty! I painted the entire inside of the cabinet, and the top and sides of the shelves.
Painted the edges and underside of shelves, as well as cabinet door with a Robins Egg blue paint leftover from another project...
All painted and drying...
We kept tripping over the little plastic white trashcan (which was simply for dryer lint). Everytime we took out our bikes, we knocked it over and lid fell off and lint went everywhere...so did the candy bar wrappers that I would toss in there to conceal my love of chocolate! So, I replaced with this cute tin bucket. I purchased it at Lowe's for about $2.50 and spray painted it red.
The spray paint station... Hubby wasn't too happy with my apparent "overspray" effect on his concrete...ooops. :/ I purchased the metal "spoon" and plastic bucket at a thrift store.
Here is my "re-organized" shelf. I was able to toss several empty cans of OFF that had been hiding in the shelf for years and consolidate extra trash bags and rubber gloves to store neatly.
The little red container was perfect for storing sponges and scrub brushes neatly and it was a whopping .50 cents at the thrift store! The cute little blue plastic vase was only .30 cents, and matched perfectly...great for storing paint sticks.
Last, but not least, I made this "faux sign" for the cabinet door. I will show you step-by-step how I did this next week...so come back!
I plan to either spray paint or use vinyl stick letters to apply words to the sink, washer and dryer. They will be: SCRUB WASH DRY - Can anyone think of a better word to put on the sink? If you think of one, let me know... I could only think of Scrub, lol.
Oh, and of course, there are just some things that you can't change...
The fact that my little princess gets very annoyed when I won't let her in the house with "dirty feet"...she was obviously doing yard work while I was busy... Hmmmmm
And THIS....the inside of a garage sink. It's well used.


