I have wanted to do this for SO long!!! We've owned quite a few RV's throughout the years, trying to find the one that fits us just right. I've never been a fan of ANYTHING in RV decor, and have always wanted to change .... well, basically all of it! lol
However, with the considerations of year, cost and resale value, we limited our DIY projects a bit. With our latest purchase, due to the age of the rig I was thrilled to get the "go ahead" from my darling husband to do whatever I wanted to spruce her up!
I'd been researching the proper way to paint the cabinets and walls in an RV for a long time, and I took into consideration everything that I had gathered from reading blogs to hearing about "fails" and good vs. sloppy preparation, quality of paints and primers, etc...
In order to hopefully save you some of the research and maybe some heartache.. I'm going to share what I believe is the "best" way to prepare your surface and apply your paint.
The prep for the walls and the cabinets is the same, no matter if it's vinyl wall paper, laminate, wood, or plastic trim (I had gold plastic trim on my cabinets and painted right over them)... even metal can be painted! Just PREP!
You will want to allow several days to complete all these steps.
What you will need:
*Wall putty (for filling holes and cracks) - also wood putty if needed (see below)
*Sandpaper - 80 grit and 220 grit
*metal putty/drywall knife*TSP cleaner and disposable lint free rags (or an equivalent TSP substitute)
*Painters Tape
*Kilz OIL BASED primer - not the water based, trust me here.
*High quality "Paint and Primer in one", (pay the price for the good stuff)
I used Behr Premium Plus Ultra
For the walls I used Satin
For the Cabinets I used Semi-Gloss
*Trim brushes and rollers (have some disposable ones for the primer, it's easier to toss cheap ones that try to wash out oil based primer).
*Fan to ventilate air out the windows!
Steps to take:
1. Open up the windows and remove your screens (you don't want to have to clean them after venting all that sanding dust through them!). Turn on a fan and point it out of a window, open up ceiling vents, get some circulation going. ;)
2. Remove all cabinet doors and drawers, remove window valances and anything else that is removable! ;) - You will do all these steps on the cabinet doors and drawer fronts as well, just do it on saw horses elsewhere.
3. IF you have "wrinkles in your wallpaper (see photos below), use your metal putty knife to scrape the surface flat.
4. Fill in any holes or scrape areas with a thin coating of wall putty or wood filler if it's in a wood portion (I had some holes in one of my cabinet doors).
5. Open up the windows and remove the screens! You don't want to have to clean sanding dust out of your screens later... believe me. ;) Set up a fan pulling air out the window and open up ceiling vents.
6. Using 80 grit sandpaper, sand every square inch lightly... the walls, the cabinets, any vinyl trim, .... everything you plan to paint must be "roughed up" a bit with 80 grit. This removes any slick finishes (even those you can't see or feel) and prepares the surface to hold onto the primer.
If desired, you can go over the cabinet surfaces with 220 sandpaper, but it's not necessary unless you feel the surface has been made too rough.
7. Sweep or vacuum floor to remove any dust that will poof up while you walk.
8. Wipe all surfaces with a damp cloth, rinse out as needed and wipe until all dust is removed
9. Using straight TSP (or equivalent) cleaner and lint free rags, wipe thoroughly ALL surfaces that have been sanded allow surface to air dry completely. Cover floor and tape off ceiling edges and window edges.
10. Make sure the cabin is WELL ventilated! Apply one or two coats of your KILZ primer (to walls and cabinets), using a roller and brush as needed. Apply to everything in a THIN coat. Do not do thick coats of primer or paint. This means more coats, but you do not want to make the wallpaper soggy!!
I say one or two coats because this will depend on your original wall paper design and cabinet darkness. Allow this to dry overnight with good air ventilation.
11. You are now ready to paint. I did my walls first. After the walls were dry, I taped off and painted the cabinets. I do believe the cabinets need more coverage than the walls. I did 2 coats of paint on the walls and 2 coats on the cabinets. I was "ready to be done" at that point, but in retrospect, I think I should have put another coat of paint on the cabinets and will do so in the "Phase II". ;)
Cut in the edges with a trim brush, then roll on a light coat of your high quality paint. I know it's hard, but WAIT until it's completely dry before you do another coat.
Depending on your paint color and the original surface, you will need 2-3 coats of paint. I know... it seems like a lot, but you want this to last, right?
You are done!!! Yay!
To add a little touch of fun, I purchased a vinyl wall word decal at JoAnns.... I was going to put it above the bed where the "headboard" was, but it would have been covered up by pillows. I like it on the cabinets. :)
Now for Photos...
BEFORE:
Cabinets were wood and laminate with vinyl/plastic gold trim. Walls were typical RV wallpaper with floral design.
I won't even discuss the "headboard" and window treatments... they simply went into the garbage. ;)
Removed all window treatments, hardware and wall "access" panel covers (behind shower).
Wallpaper wrinkles around the window edges... not good for painting! Use a metal putty knife and scrape them off.
Wrinkles removed. You will want to apply a thin layer of wall putty and sand to smooth these edges out.
Don't forget the bed base!!! I kept forgetting about it and had to come back after I'd washed out my brushes...sigh.
You'll need to click to enlarge this, but the previous owner had a large TV hanging on the front of this upper cabinet. The cable came through a "hole" they had cut in the edge and there were large holes for mounting as well. We did not want a TV in the bedroom, and were left with holes. I filled them in with wood filler and sanded smooth. After painting you can hardly tell!!
Primer is complete!!
Cutting in my wall color.
Wall color complete! :)
Cabinets are painted! Yay!
Meanwhile... in the garage... the cabinet doors and drawers were being taken care of during wall drying time. If you have mirrored fronts, be sure to cover them WELL!
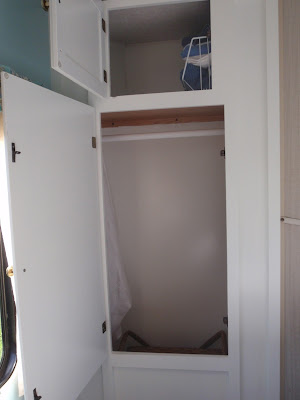
I noticed that most people do not paint the inside of the cabinet doors or the inside of the cabinets. I like bright and white, and I believe it helps to brighten the inside of a cabinet while you are looking for something in there. In addition, it just felt "incomplete" not to paint the inside...so... there ya go!
The completed bedroom, new curtains, light bright and happy! :) I love how it turned out, it makes me smile. :)


